One of the great increasing mysteries of today's modern boatbuilding is the amount of hi-tech gobble-de-gook that the average home boat builder is expected to wade through when the time comes to paint the boat after the horrendous amount of sanding, fairing and hard work is (mostly) over and the fruits of your labour now require a shiny deep lustre that the painting now promises to bring. This part, to my mind at least, is one of the best parts of boatbuilding, the finish! (Well, at least the start of the finish!)
Painting a boat used to be a reasonably simple task. All one needed was a fine dry day, one of Dad's paintbrushes, some turps, a roll of masking tape, a bit of pink primer left over from the decorating and a half gallon of shiny blue enamel paint from the local hardware store...they were the days!
Metal Saw
Not so today, my friends! The unsuspecting boat builder who toddles off to the local chandlery or superstore best be prepared for the very worst- not only will he (or she) face a huge financial onslaught on their wallet but a mind boggling array of hi-tech whiz wow balderdash that the (generally) uninformed shop assistant will proceed to throw in their general direction in the faint hope that you will give in under the stress and buy several litres of the latest polurethanicalslitheryaminomolecular goop that's just come in. For example, you'll be faced with trade names like 'Interlux Interthane coating'. I mean, come on, it sounds like a new space invaders game! This is bloody paint! There are many others but I'm sure you get the gist of what I'm saying.
Another example of the kind of thing that drives me nuts is that you can expect to buy several litres of a iso-cyanate two pack marine polyurethane paint only to be cheerfully told its illegal to spray it unless you have a proper licenced premises to do so, drone drone!! I suppose they have to make up new names to go with the new paint company policies of charging up to 0 a litre for some of these new fangled paints! What the hell have they discovered that's so expensive to put in this stuff? I was under the impression that paint was a few litres of linseed oil, turps, some drying agents and a few ounces of pigments for colour...can I really be so out of touch?
BACK TO BASICS
So, why do we paint wooden boats? Or any other boat for that matter? The first part of that question is easy. Boats look much smarter and better if they shine and gleam a bit... it's only human nature after all. The second part to that question is: We want to protect it. Ok, from what? Well, wood rots if you don't paint it, right? - wrong! Wood left to its own devices does not rot. Wood only rots as a result of its environment. There are multiple cases of how, plain untreated wood can last for centuries as long as it is in the correct environment. There are basically only a few elements that start wood rotting. Biological attack from spores, fungi, temperature, high humidity or total absorption, physical attack from marine borers and crustaceans that allow ingress to all the other elements aforementioned.
Don't let's forget that polluted waters can degrade timber to the point where it will rot....we'll add chemical attack to that list too. So, in view of all these very compelling reasons we protect our boat by painting it to coat it fully against these assaults.
PREPARATION OF TIMBER
The actual preparation of timber can cover a range of differing requirements. If your boat is a new build you won't have to go through many of the preparatory stages that an older boat may have to go through. With some forms of boatbuilding where a boat has been built by a different method such as strip planking or cold moulding, we paint the boat as if it were a fibreglass boat, due to the fact that either layers of fibreglass cover the timber or that the timber has been coated with epoxy that does not allow conventional paints to adhere to it properly. However, if we wish to protect bare timber then we use a different tack. Timber in its bare natural state has millions of thin hollow tubes running through it, constructed of cellulose in its natural form. We have to seal these tubes to prevent the ingress of water into them. Therefore we seal and coat the timber first of all.
The first thing we do is to clean and remove any loose and flaking or damaged paint plus any dirt that remains on the hull - sounds easy if you say it quick but it must be done! If necessary (and most times it is) degrease the hull using a proprietary paint degreaser after removing all dust preferably with a vacuum cleaner. Don't forget it won't be absolutely necessary to get all the hull back to bare wood just dry, clean, grease and dust free.
FILLING AND IMPERFECTIONS
Obviously, not many timber craft are perfect on the outside. There are many blemishes, cracks, imperfections and splits both large and small to deal with by filling them and sanding them flush before priming the boat. It's a bit of a chore but time spent here will reward you with a boat that will certainly look better plus have a longer life. Some folks fill these holes and imperfections in timber with epoxy filler but it is not a good idea. Sometime later, for example, when the boat has to undergo a repair, it will be the very devil of a job to remove the epoxy from a fastening hole. It's best to use some kind of proper timber filler that dries hard and fast but is never that hard that it can't be removed later on. For example, painter's glazing compound is a fairly hard setting soft paste that can be quickly applied then sanded and painted satisfactorily. Carvel boats usually have their seams filled fair with a special seam compound AFTER the boat has been primed. Once the boat has been filled and faired smooth and all dust removed we are ready to put some actual paint on. Remember, the difference between a professional paint job and an amateur is the PREPARATION!
WOOD PRESERVATIVE
There are two schools of thought about treating bare timber with wood preservatives. I've heard stories that primers and paints don't adhere to many of them. In my case, I have never personally had that happen to me, so I am generally in favour of using them. Nevertheless, I am convinced that in many cases where the paint refuses to stick to timber is because the wood has not properly dried out after application. There is a definite percentage of humidity level that every timber has (and most of them differ slightly) where paint of any description simply won't stick. It can be up to fifteen per cent in some timbers. Above all, ensure that your timber is dry enough to allow any paint or filler to adhere to it. Remember too that salt deposits on timber will readily contain water and keep it damp.... if your boat was in salty water wash it off in fresh before commencing painting. When and only when, your timber preservative is dry the next stage is:
PRIMER
The first coat of primer to go onto your hull is metallic grey primer. It is a good primer to use because it is made up of millions of microscopic flat metal (aluminium) plates that lie on top of each other giving water a very hard time to pass though it...Pink primer for example, has circular molecules of substances therefore allowing water to ingress a lot quicker...fact! Grey primers also contain certain oils and most have anti-mould agents contained within (biocides to you and I) We put two coats of grey primer above the waterline and three, no less, below it.
SOME OTHER OBSERVATIONS ABOUT PRIMERS
There are a whole world of paint primers out there and confusion about their qualities are very common. For basic dry timbers, the grey metallic primers are good as previously explained. Also many oil-based primers from well-known companies are also very good and will do the job perfectly well. Hi-build primers however must be approached with caution and I must say that I have never personally got on too well with them. Most of them contain Titanium Dioxide (that's talcum powder to us lot) and even when it is fully cured can absorb copious amounts of moisture that can prevent really good paint adhesion. To avoid this only paint hi-build primers on good clear dry days and avoid excessive atmospheric humidity levels. Then, as soon as is possible apply the topcoats to seal them in. Note too, that hi-build primers are a soft type of paint and can suffer badly from scuffing over stony or shingly beaches and even when launching from boat trailers. When sanding these primers remember that huge clouds of white dust are released so be aware of where you sand and wear appropriate safety masks.
TOPCOATS
Once again, there are many types to choose from. Let's get the two- packs out of the way first. TWO-PACK POLYURETHANES have to be applied over a two-pack epoxy undercoat first of all. They have a fantastic finish and that's fine but you must be absolutely sure that the timber underneath is not going to move because the paint cures so hard that it can and will crack (strip plankers and cold moulded boats are your best bet here...apart of course from glass boats). The primary reason is that timber constructed boats move or 'work' as it is known. You may well get away with it if your timber boat has been glassed from new....not glassed over later as a preventative method to stop leaks. Rarely boats treated thus dry out properly and are still susceptible to movement as the timber inside the glass either rots because it was wet or it dries out too much and shrinks. Also boats that have been chined properly, that is, strips of timber glued in between the planks instead of being caulked, stand a reasonable chance of not moving.
Ok, what else? One pack or single pack polyurethane paints can be a good choice for a topcoat...they are almost as glossy and as durable as the two-packs but not quite! They are however, less expensive and far easier to apply than the two-packs... there are a multitude of them out there, so a bit of research is required plus your own personal choice...I'm not going to get involved in a slanging match about which ones are the best! However, remember most major well-known paint manufacturer's products are usually ok! It's your call!
So next on my list are marine enamels. Once again, it pays to remember that anything with MARINE in front of it is usually expensive...a good place to avoid in this quest is the large hardware chain stores that sport one or two paints in this category and I've fallen for it myself before now. It's the Name we are looking for!
Even with decent quality marine enamels some of the whites have been known to yellow with age and the way round this is to buy the off-white colours such as cream or buff. My last choice in Marine enamels proper, is a relative newcomer...a water-based enamel. I personally have never used any but I have heard some good reports and there has to be a few advantages with them, quick cleanup for one and you can even drink the thinners!
ASSORTED CHOICES
There are a few types of paint systems that are different to the abovementioned and as usual they probably will draw a lot of flack from those types that love writing to the editor for some reason or the other. Mainly I suspect, because something isn't quite conventional. Each of the following paints has their different uses and attributes.
HOUSE PAINT ENAMELS
Over the years the quality of house paint enamels has been increasing dramatically to the point where many yachties I know paint their boats with it. It's a bit softer (and definitely cheaper) than most single pack polyurethanes and some colours, mostly the darker hues, tend to fade earlier than others. However, the fact remains that they can be an excellent choice especially if you own a small boat and don't mind repainting it every couple of years....cheap to buy, easy to apply!
WATER BASED ACRYLICS
A few years ago you wouldn't have dreamed of painting your boat with acrylic paint....it would have peeled off in great strips. That does not apply today however. My own boat, The NICKY J has been painted using Wattyl's Acrylic semi-gloss "CANE" and it is really amazing. I used gloss for the hull and semi-gloss for the decks over white epoxy primer single pack and it has been really good. Never once has it even looked like delaminating. I paint the boat once a year with a roller and it takes less than a day...and she's forty two feet long! It is yet another choice!
Well there's your main paint choices but I urge you to remember one thing...preparation is King... it will save you plenty of money in the long run, for sure.
HOW TO APPLY YOUR PAINT
There are of course, three main methods of applying your paints; Spraying, brushing and rollering. There's another that many people use, a combination of the last two, rolling and tipping, we'll deal with that one later.
Let's take a look at spraying. There are several pre-requisites for a decent spray job. These usually are a decent workshop complete with suction fans and half decent ventilation using good spray gear (cheapo underpowered stuff just doesn't cut the mustard) and most importantly, adequate and proper safety gear. There are always exceptions to the rule and there's one chap who works in Edge's boatyard outside in the weather and he does a fantastic job...imagine how much better he might be if he worked indoors!! You will also have to watch the weather, high humidity is not good and also where the overspray goes...not over anyone's car as is so often the case! A good excess of paint is lost and wasted in the process. If you have a driving need for you boat to look like your car then sprayings for you! Oh yeah, it quick(ish) too!
Brushing by hand can yield incredible results if you are patient and also know what you are doing. I've seen boats that at first glance look like they have been sprayed only to find out that they were hand painted by brush.......Dust free atmosphere and bloody good brushes (I mean expensive) are an absolute must here.
Last of all, rollering especially the 'roll and tip' method. This requires two people working together as a team. One rolls the paint on thinly and the other follows closely with a decent brush and 'tips' out the bubbles left behind by the roller - unbelievably good finishes can be obtained by this method.
A word of warning, no matter which method you use. Don't be tempted to retouch runs or sags in the paint or you will ruin the finish....wait until the paint has fully dried then deal with it! It's tempting but paint always seems to gel quicker than you would think!
A SUMMARY
There are many facets to the successful painting of a boat. We can't be good at all of them and you have to choose the method most suited to you own particular capabilities. A lot depends on the facilities that you have available at your disposal. Some people have the garden to work in others may have huge sheds and even access to a warehouse! I will say that a few basic rules apply to painting even the smallest boat. Often, too much, too clever or too sophisticated is often detrimental to what you are trying to achieve.
I have seen boats that cost twenty grand to paint and they were just really average...why? Wrong choice of painter, that's why. If you are going to choose a painter it's not a crime to ask him to show you some examples of his work. If he's any good there should be plenty...there are plenty of chancers and cowboys about, rest assured. All boats, every single one of them will need retouching or even a repaint within years. Just how long you get for your money is the trick. Unless you put your freshly painted boat in a museum or garage and lock it away you can bet that from day one, it will collect nicks, dings, scratches and scars, it's inevitable. Beware the painter who tells you, 'yes it will be ten grand, but it'll outlast you and me'. The need for repainting is directly proportional to how badly the boat is treated over the years. The only way of keeping your boat pristine and perfect is never to actually put it in that dirty old water once it's done! Be realistic about your own abilities and your expectations. Simple can be better in many cases.
A SIMPLE FORMULA FOR CALCULATING HOW MUCH PAINT YOU NEED (FOR ONE COAT)
This is interesting if not exactly exact! But it gets very close indeed. This is applicable to brushing and rolling only NOT spraying. There's a different formula for that and I don't know it!
THE FORMULA
ONE COAT = The boat's length overall x the beam x 0.85
Divided by square feet covered per litre listed on the paint can instructions.
If you can't work it out the paint manufacturer will tell you if you ring the company hotline.
Over the years, wooden boats have survived the elements in spite of very crude and primitive forms of paint. Many early vessels were simply daubed in pitch, bitumen, turps and beeswax. An early Thames barge had survived for over a hundred years in perfect condition as she was originally used as a bitumen tanker!! The dark brown shiny finish was the most perfect example of preserved wood that I have ever seen. One of the most interesting boats I ever saw was painted with fence paint...the owner reckoned he'd only ever painted it once in thirty years! Another old boat builder I knew once told me the secret of painting a wooden boat was to paint it with as many coats of paint that you could afford!
Christmas Sales Makita LC1230 12-Inch Metal Cutting Saw 201
Dec 22, 2011 03:30:37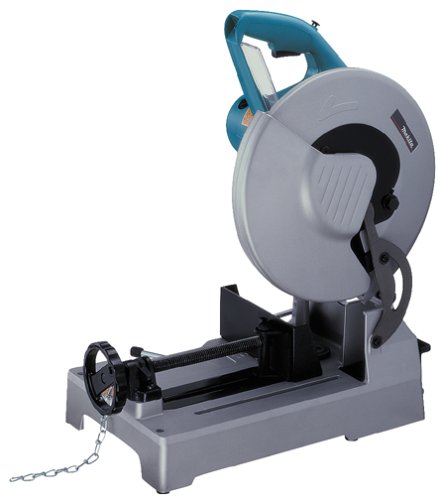
Click for larger image and other views

Christmas Sales Makita LC1230 12-Inch Metal Cutting Saw Feature
- 4 x faster cutting in light pipe, angle iron, tubing, conduit and channel than abrasive cut-off saws
- Powerful 15 amp motor
- D-shape handle for easy gripping
- Long lasting carbide tipped blade for cost efficient, clean and accurate cutting; virtually burr free
- Lock-off button prevents accidental starting
Christmas Sales Makita LC1230 12-Inch Metal Cutting Saw Overview
This Metal Cutting Saw is fantastic for cutting light pipe, angle iron, tubing, conduit and channels. Its D-shape handle means easy gripping. Economical and long lasting carbide tipped blades cut through material fast. No more accidental starts thanks to this clever tool's handy lock-off button. The guide plate on this saw adjusts 0 - 45 degrees for bevel cutting and sports a quick release vise for secure stock retention and fast repetitious cut-offs. The socket wrench is stored on the base for easy access, and a shaft lock system shaves a lot of time off wheel changes. Your purchase includes carbide tipped blade, a socket wrench, and a switch button.Christmas Sales Makita LC1230 12-Inch Metal Cutting Saw Specifications
Makita's 12-Inch Metal Cutting Saw (model LC1230) delivers power and ease-of-use features for a range of industrial metal-cutting applications. It is ideal for cutting in pipe, angle iron, conduit, and more. View larger | ||||
|


| ||||||||||||||||||||
| ||||||||||||||||||||

The LC1230 is powered by a Makita-built 15 amp motor that delivers 1,300 rpm for improved performance. The quick release tool-less guide plate adjusts from 0 degrees to 45 degrees for quick and easy miter cutting. Cutting capacities range from 4-1/2 inches at 90 degrees to 3-1/2 inches at 45 degrees.
Ease-of-Use Features for Improved Performance
Ease-of-use features include a quick release vise for secure material retention and fast repeated cut-offs, a socket wrench that stores on the base for convenient blade changes, and a shavings collection tray for easy waste disposal and a cleaner work environment. The LC1230 has a D-shaped handle with a two-finger trigger and a lock-off button engineered to prevent accidental start-ups. The saw includes a carbide-tipped blade that lasts 50 times longer than abrasive wheels and is engineered to cut clean, accurate and virtually burr-free. The LC1230 is ideal for a variety of industrial metalworking applications. It is just another example of Makita's commitment to innovative technology and best-in-class engineering.
About Makita Saws
Cut after cut, Makita saws deliver power, performance and capacity with less weight and more ease-of-use features. Makita has a full range of corded and cordless saws and blades for cutting wood, metal and masonry, including table saws, miter saws, reciprocating saws, circular saws, jig saws, metal cutting saws, plunge saws, and more, as well as a complete line of blades and accessories.
![]() About Makita
About Makita
Makita is a worldwide manufacturer of industrial quality power tools and offers a wide range of industrial accessories. Makita applies leading-edge innovation to engineer power tools that are more compact and energy efficient, yet deliver industrial strength power and results. Makita U.S.A., Inc. is located in La Mirada, California, and operates an extensive distribution network located throughout the U.S. For more information, please call 800/4-MAKITA (800/462-5482) or visit makitatools.com. Makita is Best in Class Engineering.
Warranty
Every Makita tool is thoroughly inspected and tested before leaving the factory. If you are not satisfied with any Makita tool within 30 days of purchase, return it and Makita will provide a replacement or refund. Each Makita tool is warranted to be free of defects from workmanship and materials for the period of ONE YEAR from the date of original purchase. Should any trouble develop during this one-year period, return the COMPLETE tool, freight prepaid, to one of Makita's Factory or Authorized Service Centers. Please see makitatools.com for complete details.
What's in the Box
Makita LC1230 12-Inch Metal Cutting Saw includes: carbide tipped blade, socket wrench, switch button, and safety goggles.
SAVE NOW on Christmas Sales Offers below!
Available In Stock. |
| This Christmas Makita LC1230 12-Inch Metal Cutting Saw is cheap and shipping as well. |
Price : Click to Check Update Prices Please. |